The Pixim VLSI Configuration Managementcdsp4
guide
by Mike Klein
version 0.5
3 Design Organization Overview
3.1 Default Cadence dfII Hierarchy
3.6 Branch, Client, and Workspace Overview under cdsp4
5 The Cadence Database Structure Under cdsp4
6.4 Checking a Cell Out for Edit
7 Temporary Libraries and Cells, Not Under cdsp4 Control
8 Building a New Branch Similar to An Existing Branch
9.1 Define a Technology Library Per Project
9.2 Updating a Technology Library
11 Building a New Branch (Admins Only)
12 Migrating Existing Data to cdsp4 (Admins Only)
13 Internal Structure and setup (Admins Only)
13.3 Clients Associated with a Branch
13.5 How Does cdsp4 Tell Which Libraries are Revisioned?
14 Adding Libraries to Existing Branches and Workspaces (Admins Only)
14.1 Why Adding Libraries is Hard
14.2 Steps for Adding a New Library
15 Deleting Libraries from a cdsp4 Branch
1 Introduction
Perforce is a revision and configuration
management system. The Cadence custom design tools (Virtuoso and
Composer, collectively called “dfII”) require configuration management
support as well. This is provided by a BSD
open-source licensed package of scripts and SKILL code called “cdsp4,”
available from the Perforce public depot website and written and
supported by Shiv Sikand (shiv@sikand.org). This
document describes the use of cdsp4 in a custom design environment,
and, where useful, some more detailed background of how cdsp4 works.
If you are looking for high performance from cdsp4, you should use a
Gnu/Linux box. XFS is a recommended filesystem because of its high
performance, scalability and journalling support. The server does not
require much CPU -- a fast disk and decent amount of RAM (512 MB+)
coupled with a performance filesystem will deliver you ~10X performance
over any SUN Workstation or Server running Solaris with the UFS
filesystem. Cadence databases contain large amounts of small files --
UFS has very poor inode creation performance making it a less than
ideal choice for cdsp4. You should also avoid the use of NAS storage
such as a NetApp due to poor write bandwidth on such systems.
2 Naming and Terminology
cdsp4, like most configuration management systems, is structured with a central repository with all file histories, and private workspaces for users to work within for editing and running other operations (DRC, LVS, etc.). Perforce is a client-server architecture where the server manages the file histories, and the clients make requests of the server to do file revisioning operations. cdsp4 provides a GUI interface to the Perforce clients integrated within the Cadence dfII framework.
cdsp4 is closely integrated into the dfII
framework and working with it should be largely familiar to dfII users. Here are a few terms and concepts specific to cdsp4
configuration management:management. The
relationship between them is described in more detail in Section 3.
§ Depot: where the Perforce server stores all its files and their histories. Only the Perforce server works with the depot. The depot contains an efficient storage of all versions of all files ever entered into the Perforce system.
§ Workspace: private files in the user’s sandbox or home directory, managed by cdsp4 through the dfII Library Browser. Through the dfII Library Browser, the user requests cdsp4 to get files from the depot which are then copied into their workspace. Also through the Library Browser, files are checked back in to the depot for checkpointing, sharing with other users, or when the user is finished with edits.
§ Branch: a part of the Perforce depot built for users to work on a project, assigned a simple name such as dynamo_a0_cds1. A branch is the source from which users check out and check in their local files for a particular project. Any number of users can build workspaces from a branch. A branch can be long-lived (a chip database), or short-lived for an experiment whose outcome is not yet known and edits should be kept separate from the intended final database. There can be any number of branches, although more branches does add potential confusion but is usually mitigated by having a well defined naming scheme.
§ Client: A client is a template that defines the contents of your workspace and where these files are placed in your workspace. All clients, being specific templates for a specific set of files for a specific user, are uniquely named. Using a template scheme is a useful way of defining a workspace rather than referring to its location in the UNIX file system. Any user can have any number of unique clients, allowing you to manage multiple workspaces. Again, a well-defined naming scheme for clients allows easy identification.
In summary, a client is the definition of a particular workspace. In cdsp4, each Cadence library has its own client, and all data management operations on a library are performed through the client. The name client can be confusing to some people from a semantic standpoint, but it is simply a “workspace definition.”
3 Design Organization Overview
3.1 Default Cadence dfII Hierarchy
Cadence dfII provides a two-level hierarchy for organizing design data: cells, the lowest level, are contained within libraries. A dfII session can access a number of libraries as controlled by the contents of the cds.lib file. Large custom designs quickly make this two-level hierarchy difficult to deal with because of the amount of data involved.
Under cdsp4, three higher levels of hierarchy are introduced for managing the design data: the project, the branch, and the user workspace. Adding these hierarchy levels makes it straightforward for a user to easily generate a workspace containing the entire set of data used for taping out a particular revision of a project, for example, or to archive all data history for a chip revision.
3.2 Project
A project is what usually goes by an internal code name such as Dynamo, Dynamite, Hawk, etc. A project usually has a long life, involves a lot of people, and tapes out numerous revisions. It is really more a conceptual label than a clearly defined set of data, although cdsp4 does have the concept of a Project Root (explained in more detail below).
3.3 Branch
A branch is the subset of the Perforce depot that holds the data of a specific revision of a project[1]. A branch should always be defined so that it is the fundamental unit of work that is communicated between groups, either internally or externally, and includes all data that a tight group of people is likely to edit over time. A branch is what is “released” from one group to another as a whole unit and is what each user builds a workspace for. In Perforce terms, specifying a branch name and a change number should completely and uniquely define the state of a project.
There will always be one branch per tapeout of a project, Dynamo A0 for example, and there may be any number of long-lived or temporary branches for other purposes. The branches of a given project are closely related to one another since one branch generally derives all its initial data from a previous branch, such as Dynamo’s A1 tapeout branch deriving all its initial data from Dynamo’s A0 tapeout branch.
Branches are independent of each other. By default, modifications in one project revision’s branch do not affect any other branch. However, if a change in one branch needs to be applied to other branches, cdsp4 (and Perforce) provides mechanisms to explicitly propagate selected data from one branch to another.
3.4 User Workspace
A user workspace is the location in the UNIX file system where a user does actual work on project branch data: adding cells, checking cells in and out, editing them, verifying the design, etc. There will generally be many user workspaces for a branch, at least one per Cadence user. There is a one-to-one mapping between a user workspace and a unique cds.lib file, and a separate Cadence application session is run in each workspace. A workspace is a user’s own private data and, unless checked in, does not affect any other user’s workspace. It usually takes about 2-5 minutes to build a complete user workspace containing about 1000 cells.
Finally, within a user workspace are the set of Cadence libraries, and within them the cells that make up a full design, as determined by the workspace’s cds.lib file.
3.5 Usage Overview
Users without experience in managed Cadence environments typically have developed ad-hoc methods for organizing their data. At many companies the growth of multiple versions of projects has resulted in very complex cds.lib files and long, complex library and cell names to keep data unique.
Under cdsp4, the usage model is different. A Cadence application session is run in a single user workspace, and therefore works only with data of a specific revision of a project. A cdsp4 user workspace contains data for only one revision of one project. Users who work on multiple projects or revisions of projects run one Cadence application session per revision, each in a separate workspace. Relatively few libraries are defined, with simple names that do not contain version information in them.
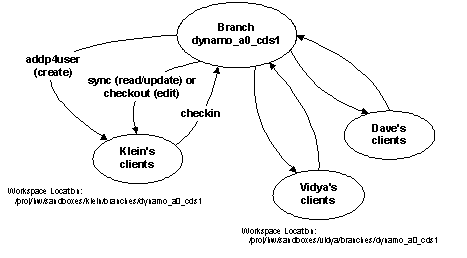
Figure 1: Branch/client relationship
3.6 Branch, Client, and Workspace Overview under cdsp4
Cadence applications are run from your own
workspace. MultipleA workspace is formed by
a number of Perforce clients, fromone per Cadence library[2]. Multiple workspaces, for multiple users, can
be built from a single branch, allowing users to share and communicate
branch data without conflicting with each other. cdsp4
manages exclusive checkouts and version consistency so that you cannot
conflict with another person’s work or edit out-of-date cells.
ClientWorkspace data is not shared with any
other clientsworkspaces directly, only by checking
in from one clientworkspace into the branch, followed
by a sync and subsequent checkout into another clientworkspace if edits
are required.
Figure 1 shows the basic relationship between a branch and a number of clients and their workspaces. The three most basic common operations are shown for a typical workspace:
· Building the workspace initially, using addp4user
· Syncing to newly edited cells or checking out cells for edit
· Submitting edits back to the branch (checkin)
When a client is first built, all Cadence data in the client is read-only. Only by checking a cell out using the cdsp4 Library Browser can a cell be made editable.
When the user is finished editing the cell, they check the changes in, again using the Library Browser. When a cell is checked in:
· The changes are checked in to the branch, using Perforce’s atomic submit mechanism to guarantee that all the cell data was successfully checked in without corruption. The revision history of the cell is updated.
· Within a few minutes, the updated cell data is automatically synced into each client working from the same branch[3]. If desired, any user can override the time delay and immediately get the new cell data.
Other useful query functions are provided by cdsp4, including:
· Which cells are currently checked out by a given user (or all users)
· Which cells are different between your client and the branch it was built from, or even any other branch
· The complete version history of a cell, and the ability to revert to any of them or make temporary copies for viewing different versions simultaneously.
4 User Setup
Users who wish to work with data from an existing branch simply need to set up a workspace using addp4user, and ensure they are using the Cadence software installation that has cdsp4 integrated into it.
The addp4user command takes care of setting up the workspace for a user. The steps to use it are as follows:
1. The user must set the PROJECT environment variable to the path which identifies the master project and revision . A general syntax is of the form
/proj/hw/project/root
For the Dynamo database, the full command would be:
setenv PROJECT /proj/hw/dynamo/root
2. The user now runs addp4user with the following arguments, all required:
-bname branch_name
-tp user_workspace_directory
-user username
This tells addp4user to use branch_name as the branch to build the workspace from, to locate the user’s new workspace at user_workspace_directory/branch_name, and to build the appropriate set of Cadence library clients (one per library) for username. username can be an arbitrary string to make the client names unique; for example if a single user builds multiple sets of clients from a single branch, they should use a unique username for each new workspace built by addp4user. Note that the branch branch_name must already exist, as must user_workspace_directory.
It is generally advisable to place all your addp4user workspaces in your sandbox under a single branch directory. An example would be:
% mkdir /proj/hw/sandboxes/klein/cdsp4_branches
% addp4user –bname dynamo_a1_cds1 –tp /proj/hw/sandboxes/klein/cdsp4_branches –user klein
3. Change directory to the workspace root (user_directory_root/branch_name) and run the Cadence tool.
5 The Cadence Database Structure Under cdsp4
A Cadence database consists of one or more libraries of cell data, and a number of peripheral files such as technology files, display patterns, etc. Cadence design data is a two-level hierarchy: libraries, and cells contained within libraries. A cell typically has a number of different views such as layout, symbol, schematic, etc.
At the lowest level, cdsp4 revisions cell data on a cell-by-cell basis and this is the granularity at which checkouts, checkins, and queries are done. cdsp4 assigns a separate client to each library in a user’s workspace. The entire collection of revisioned libraries for a design is determined by the definition of the branch. Users’ cdsp4 client names are always three fields separated by colon characters (`:’):
library:branch_name:username
Usually a Cadence database consists of data from the current project which may need to be edited, and reference data, which may be from a different database or branch or supplied as part of the Cadence tool installation. The project data physically resides in the Perforce depot in branch_name, and each invocation of addp4user for that branch brings copies of all the project data into the user’s workspace. In the cds.lib file in the user’s branch directory (where they start the Cadence tool), all the project libraries are listed with DEFINE statements. addp4user manipulates the DEFINE statements in the cds.lib file to reference the user’s local workspace data when the clients are built.
Reference data is listed in the cds.lib file with INCLUDE statements. cdsp4 does not manage INCLUDE statements, but passes them directly through from the prototype cds.lib file under the project branch directory for branch_name when building the user’s cds.lib file.
The relationships between the $PROJECT variable setting, branches, and clients are shown in Figure 2. Note that path and branch names are examples only; they may not exist in a current database.
Figure 2: Branches, clients, and $PROJECT
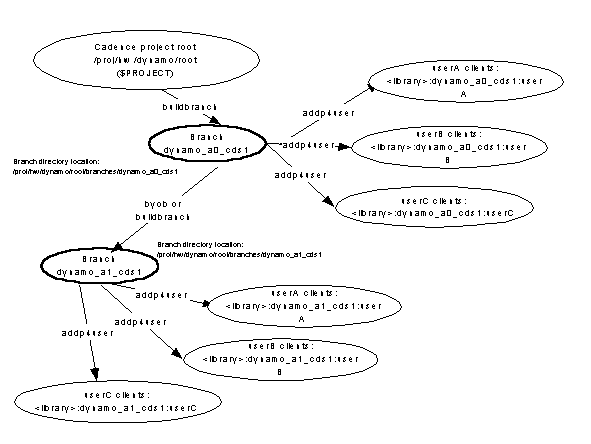
As can be seen from Figure 2, three elements are required to uniquely identify the data that a user is working on:
· PROJECT variable: location of of the project Root
· Branch name
· User name
6 Basic cdsp4 Operations
6.1 Library Browser
The Library Browser under cdsp4 looks different from under normal dfII operation. All normal dfII operations are supported, and a number of new functions are added. A few things are different:
· The default “double-click” action on a cell is to open the cell view for reading, not editing[4]
· The Library Browser window is vertically stacked, not horizontally as the default dfII browser is
Multiple selections may be made by holding down either the Shift key while selecting to select all entries between two selections, or by holding down the Control key while selecting to add entries one by one into the selected set.
6.2 Read-Only Operations
The typical Cadence dfII read-only operations such as viewing cells are similar to the normal dfII operations under cdsp4.
6.3 Synchronizing Workspace
By default, when the Cadence dfII session starts, auto-synchronization processes also start up that automatically synchronize your workspace with the branch every 5 minutes. If it is desired to synchronize at other times, the Library Browser’s Library Commands -> Synchronize can be selected at any time.
Alternatively, a workspace can be synchronized from outside the dfII GUI by running the addp4user command on the existing workspace. See Section 5 for information on how to run addp4user.
6.4 Checking a Cell Out for Edit
Checking a cell out for editing can be done one of two ways:
· From the Library Browser, select Edit from either the Cell or Cellview Commands menu after selecting a cell. Multiple cells can be checked out for edit using the Shift or Control keys while selecting.
· From the viewing window, selecting Design -> Make Editable checks the cell out for editing
6.5 Checking Cells In
The best way to check cells in is to select the library the cells belong to in the Library Browser, then select the Library Commands -> Show Checkouts command. This brings up a form listing all cells currently checked out of the library and allows the choice of a few options. Any or all of the cells listed can be checked in at once[5].
The important option on the Show Checkouts window is Window Mode, which has three possible values:
· Preserve Edit: check in the selected cells and immediately check them back out for more editing. Keep all edit windows open.
· Preserve
Read: check in the selected cells; do not check them out again. Keep all edit windows open but the windows change
to Readingread mode.
· Close: check in the selected cells, do not check them out again, and close all edit windows.
After making the cell and option selections, click the OK button. A window appears for the checkin comment. Please fill this in with a useful comment, although it is not mandatory.
6.6 Making a New Cell
From the Library Browser, select Cell Commands -> New. Fill in the form with the new cell name and view name (such as “layout”).
Edit the new cell as desired (which can include copying data from an existing cell). When done, it can be checked in the same way as cells checked out for edit as described above. Adding the new cell to the library can also be cancelled as described below for checked-out cells.
6.7 Cancelling Checkouts
As in Section 7.5, bring up the Show Checkouts window. Select the Cancel Checkout button instead of the Checkin button. Select the cells to cancel checkout, and click the OK button. Newly defined cells also appear on this list and their addition to the library can also be cancelled.
After a newly added cell has been cancelled, the cell still appears in the Library Browser’s cell listing. To clean up the cell listing, do these two steps:
· Library Commands -> Clean Catalog
· Click Rfsh button next to Library Commands menu
6.8 Deleting a Cell
Select the cell(s) to delete and select Cell Commands -> Delete. If only a particular view is to be deleted, select the view in the Cellview window and selected Cellview Commands -> Delete. The cell name will still appear on the cell listing even though the data is gone; to clean it up, follow the steps in Section 7.7.
In Perforce, deleting a cell actually does not delete the data permanently, but prevents the cell from being included in the “head revision” of branches or workspaces. All previous versions of the cell are retained intact along with the full version history, which allows a previous state of the database, with the deleted cell still included, to be recreated. The deleted cell can always be added back in to the database.
6.9 Other Useful Functions
Other useful functions include:
· Copying an existing cell to a new one, with source and target under cdsp4 control:
o Cell Commands -> Copy
· How do I put a cell under cdsp4 control if it already exists in a cdsp4-revisioned library, but the cell isn’t under cdsp4 yet?
o Select the cell and select Cellview Commands -> Check-In
· WhichWhat cells are
currently checked out by me?
o Library Commands -> Show Checkouts
· WhichWhat cells are
currently checked out by anybody?
o Library Commands -> Show Checkouts. Select “Everyone in this branch” button.
· What is the edit history of this cell?
o Cellview Commands -> Show Versions
· What are the last few cells I opened?
o Click “His” button next to Cell Commands menu
· What if I want to take a look at a previous version of a cell or revert to an older version ?
o Cellview Commands -> Show Versions. Now pick a version from the list and click the “Build Version Copy” button and then the “OK” button to get a temporary cell not under version control. To revert to an older version is the same as above, but select “Revert Version” instead
7 Temporary Libraries and Cells, Not Under cdsp4 Control
Good revision control practices mandate that everything that could conceivably contribute to some final product should be put under revision control. Sometimes this adds more overhead or is simply unnecessary, although these cases are usually much less frequent than most people think!
For example, while experimenting with layouts to determine how a number of cells might interact in various layout combinations, a holder cell is commonly used to instantiate the cells being worked on. This holder cell may not be useful to keep after the layout work is done (although, for example, if further cell edits are required, the same holder cell would be very useful to still be available to test the new layouts).
As another example, a library containing cells used strictly for early experimentation by one individual who plans on many possible iterations before deciding whether the layouts are useful might also be unnecessary to keep under revision control. Again, the converse can be true also; if multiple designers want to look at some of the experiments, or the original designer wants to go back to some previous version otherwise erased, it would have been better to revision even such an experimental library under cdsp4.
In any case, it is possible to build libraries and cells outside cdsp4, the warnings in the previous paragraphs notwithstanding.
To make a new library in the current dfII session for experimentation, not to be managed by cdsp4:
· Select CIW window’s File -> New -> Library command, specify No DM as Design Manager, and select the “Attach to an existing techfile” button. When the techfile form appears, select the project’s techlib library (example: dynamo_techlib).
· If it is later desired to add this library to cdsp4, please contact a cdsp4 Admin, who will need to follow the steps in Section 15.
8 Building a New Branch Similar to An Existing Branch
A simple way to build a new branch that is very similar to an existing branch is to use the byob (Build Your Own Branch) program. This is the easiest and most common way to build a new branch.
Usage is very simple:
byob –source source_branch_name –target new_branch_name
byob has three requirements before it can be run:
· Of
course, source_branch_name
must already exist.exist as a cdsp4-managed branch
· Building
clients from the new branch would use addp4user just
like building clients for source_branch_name,
except that new_branch_name would
be used for the –bname
option. The –tp and –user
options would be the same.No cells in source_branch_name can be opened for
editing, adding, or deleting. To make sure,
select one library from the library list for the source branch in the
cdsp4 Library Browser, select Library Commands -> Show Checkouts,
click “Everyone in this branch” and Library -> All.
· The directory where the new branch will be placed must already exist and be writable by the user running byob.
The new branch will be located next to the source branch in the UNIX directory hierarchy. Once the branch is built, workspaces can be immediately built from it using addp4user as described in Section 5.
Example: Dave had originally built a workspace for the existing dynamo_a0_cds1 branch:
% addp4user –bname dynamo_a0_cds1 –tp /home/dave/cds_branches –user dave
After many edits and a tapeout, Dave would like to make a Dynamo A1 branch using the current state of the Dynamo A0 database as the starting point, and build a new workspace for himself from it. The two steps to do this are:
% byob –source dynamo_a0_cds1 –target dynamo_a1_cds1
% addp4user –bname dynamo_a1_cds1 –tp /home/dave/cds_branches –user dave
Other Cadence users who will be working on
Dynamo A1 would need to build their own clientsworkspaces from the
new branch as well, using the same addp4user command as above
but with their own user name and workspace location.
Using byob is also ideal for users to work together on a set of edits isolated from the main project, such as when performing an experiment whose outcome is not known. A branch built with byob can simply be abandoned if the experiment did not work out or if tapeout goals were changed, or the changes made in the new branch can be selectively integrated into any other branch if the outcome was successful. All the while, Perforce maintains the full history of every cell in every branch, and this history can be queried through the Library Browser.
If significant changes are required in a branch definition, or a new project is being established, then a Perforce/cdsp4 admin should be contacted to set up a new branch from scratch.
It is important to note when building a new
Cadence branch that there is normally a parallel Perforce tree of
non-Cadence data for the same project, containing Verilog, timing
models, layout abstracts, DV data, LVS and DRC scripts, etc. Each of these non-Cadence trees has a “ref”
directory with symbolic links to external referenced data such as
read-only libraries, technology files, etc. The
Cadence technology file used for the cdsp4 branch must be referenced
through the non-Cadence project tree’s ref/tech symbolic link to
ensure consistency. When building a new cdsp4
branch it might be necessary to build a new non-Cadence branch with its
own reference pointers if some will be different from the existing
project’s, and recompile the cdsp4 branch’s techlib project_techlib library.
9 Technology Files
9.1 Define a Technology Library Per Project
The Cadence “technology file” contains layer, color, pattern, and other information for layout data. Every Cadence layout library must have a technology file associated with it. Cadence provides two methods of “attaching” technology file data to a design library:
· Attach a “technology library” to the design library, or
· Compile a technology file into the design library
The greatly preferable way is the former. In this case, a special “technology library” is built for each design database whose sole purpose is to have a technology file compiled into it and have all other design libraries reference this technology library to get its technology file information. The biggest advantage to this is that if the technology file changes, only the technology library needs to recompile the modified technology file, not each design library.
Within cdsp4 the same approach should be used. Because cdsp4 adds some structure on the Cadence database by grouping a design consisting of a number of libraries into one branch, the following rules should be followed when setting up the technology library:
· There
should be one technology library per branch, named techlib_projectproject _techlib to keep the name
simple, easily recognized, and unique, for example:
techlib_dynamodynamo_techlib
· The technology file compiled into the technology library needs to be explicitly chosen for the project from the “ref” pointer in the project’s non-Cadence tree. Example for Dynamo A0:
/proj/hw/dynamo/a0/ref/tech/cadence/virtuoso44.tf
The technology library is treated like any other library under cdsp4. This way all users building cdsp4 workspaces get the technology library along with the design libraries automatically, and it is autosync’ed when it changes.
9.2 Updating a Technology Library
Occasionally a Virtuoso technology file needs updating, and therefore the technology library that uses that technology file needs to be updated. The advantage of defining a technology library that all other libraries in the project attach to, as described earlier, then becomes clear: only the technology library needs to be updated and all design libraries that attach to it are automatically updated.
Updating a technology library is slightly more complex under cdsp4. The file that contains the technology information in a library is called techfile.cds, and is at the top level of the library. Unfortunately, cdsp4 does not provide the ability to explicitly check out this file like it does for cell data. Instead, the p4 command line interface needs to be used to check out techfile.cds. All other checkouts and checkins for technology library updates are done with the cdsp4 interface; do not do any other p4 command line operations except as described below!!
Here are the steps for updating the technology library. For this example, assume the technology library for the Dynamo project is called dynamo_techlib.
1. cd into the dynamo_techlib directory in the workspace the Cadence application (icfb, layoutPlus, etc.) is running from
2. Determine the client name for this workspace library. It will be:
dynamo_techlib:branch_name:user
3. Check out the technology file for edit:
p4 –c dynamo_techlib:branch_name:user edit techfile.cds
4. From the Library Browser, select the dynamo_techlib library and select all the cells appearing in the Cell View listing. Select Cell View -> Edit. This will check out all the cells.
5. From the Cadence CIW window, select Technology File -> Load. Type in the location of the new technology file. Click the Select All button for the Classes selection, ensure that dynamo_techlib is shown as the Technology Library to be updated, and click Replace at the bottom of the form. Finally, click the OK button. The new technology file should compile.
6. After successful compilation, from the Cadence CIW window select Technology File -> Save. Ensure that the Technology Library menu shows dynamo_techlib. Click the OK button.
7. From the Library Browser window, select the dynamo_techlib library and select Library Commands -> Show Checkouts. The cells previously checked out, plus the file techfile.cds, should show up in the Show Checkouts window. Select all and click the OK button, and provide the checkin comment.
10 Deleting a Workspace
Once a workspace is no longer needed, it should be deleted for two reasons:
· Reduce the amount of data Perforce needs to track, improving long term server performance
· Reduce disk space usage
cdsp4 provides the wsclean utility to delete an existing branch’s clients from a user’s workspace.
11 Building a New Branch (Admins Only)
When a new project starts that is significantly different from a previous project, it may be better to build the new project’s branch from scratch. This involves substantially more planning to identify the parts of the new project that will be branched from an existing project or projects, imported from elsewhere, or built from scratch. Each source of data will be brought into the new project’s branch in a different way.
The buildbranch command builds a new branch from a project root[6]. It requires the following arguments:
-tpbranch_directory_root
-bname branch_name
This will build a new cdsp4 branch named branch_name from an existing root. The new branch will be located under the directory branch_directory_root. A location can take the form
/proj/hw/project/root/branches/
To make a new branch named dynamo_a0_cds3 in the appropriate location from the project root:
buildbranch –tp /proj/hw/dynamo/root/branches –bname dynamo_a0_cds3
Buildbranch must be run by a user permitted to write into branch_directory_root.
12 Migrating Existing Data to cdsp4 (Admins Only)
When dfII data already exists, the following steps must be taken to put the data under cdsp4 configuration management control:
1. Make a copy of the complete dfII library to be put under cdsp4, in the location to become the root. The original data becomes a backup only and should no longer be edited or referred to once conversion to cdsp4 is complete. The location of the data to be put under cdsp4 should be under:
/proj/hw/project/root
2. If necessary, map any names of libraries or cells containing illegal characters to legal names using the fixhash.il SKILL program. Please read the comments at the top of this code to determine the correct mode of operation as welll as instructions for removing extraneous files introduced by the use of DesignSync/TDM etc. cdsp4 does *not* add any files to your data hierarchy like other Cadence integrations. You must also make sure that there are no leftover lock stake files in your copied tree , using a command such as:
find . –name
\*cdslck\* -print –exec rm {} \;
3. Revision the data using cdsp4 using Library Browser’s Library -> Revision command. Make sure that the cdsinfo.tag and prop.xx files are writable. cdsp4 will check this data into Perforce using an atomic transaction per cellview. Do not manually revision or attempt to checkin Cadence data using the p4 command line, you must use the Library Browser interface. You will be required to choose the library type and a blockname. You must choose either “Design” or “Reference”. A Reference library has extended access control mechanisms while a Design library does not. The choice of blockname is required; use the default “top” if you do not care for additional partitioning in the depot namespace.
4. Define a “reference” client for the new data using p4 –c project_revision_ref_top client. This reference client is the branching spec used by buildbranch to determine the set of files to branch. Here is an example:
View:
//depot/dynamo/root/cadence/top/... //dynamo_root_ref_top/cadence/top/...
In this example, the branch will contain all the libraries revision below cadence/top.
5. Build a new branch from this one using buildbranch.
6. Build a workspace for each user who will view or edit data from the branch using addp4user
13 Internal Structure and setup (Admins Only)
13.1 The Root
The “Root” for a Cadence project database is the location where the first checkins of Cadence data (p4 adds) were done for that project. All branches of a Cadence project database trace their origins to a Root.
When new libraries need to be added to a project database, the libraries must be added to the Root first, and then propagated to all branches that have been built from the Root. For more details on this procedure, please see Section 15.
The directory path to the cdsp4 Root is what the PROJECT environment variable must be set to. However, the relationship between PROJECT and the data that resides at that location is not so direct. The value of PROJECT is used by cdsp4 as follows:
· buildbranch uses it to find the location of the source data in the depot for the “p4 integrate” step of building a branch, and for locating the cds.lib and cds.p4client files to install in the new branch
· other scripts use it only as a string that is parsed to extract project and revision information (each site may define where to find this information differently)
One client is made for each library in the Root project database, named library:{CDS_Project}_{CDS_ProjectRev}. By site convention, project_rev is derived from one or two path components of PROJECT.
i.e if PROJECT is /proj/hw/dynamo/root
CDS_Project=dynamo
CDS_ProjectRev=root
So the client would be
library:dynamo_root
Note that the use of “Root” described in this section does not have anything in common with the Perforce usage of “Root” in client definitions, a potential source of confusion.
The easiest way to set CDS_Project and CDS_ProjectRev is to set it in your master .cdsinit file, before you load any SKILL.
proj = getShellEnvVar("PROJECT")
unless(proj
error("Session init aborted, no PROJECT set !!!")
)
pdata=parseString(proj "/")
CDS_Project = nthelem(3 pdata)
CDS_ProjectRev = nthelem(4 pdata)
13.2 Set up the config file
Browse the CDS_P4Config.il file. Most variables are self-explanatory except one.
The variable that need to be set correctly initially is:
CDS_P4MasterClientRelLocation
This should be set to the same place as the location of your cds.lib file for the project. In cdsp4, for every master cds.lib file, there needs to be a cds.p4client file. This file is automatically generated, but it’s location needs to be defined.
13.3 Clients Associated with a Branch
When a branch is created in cdsp4 using either buildbranch or byob, cdsp4 creates a group of Perforce clients for the branch: one per library in the branch plus one more for the branch itself. These clients are:
· branch_name_client for the branch branch_name. This client allows scripts to locate the branch directory by parsing out the Root: field in the client definition.
· library:branch_name for each library library in the branch branch_name. Because every data operation in Perforce requires a client through which to operate, these clients are used for all Perforce branch operations such as “p4 integrate.”
13.4 User Clients
Each library in each user workspace has its own client, named
library:branch_name:user
User clients always have three colon-separated fields.
These clients are the normalnormal, fully functional
Perforce clients in that they govern the workings of all typical
Perforce operations between the depot and a workspace such as checking
files out, checking in, synchronizing, running queries, etc.
13.5 How Does cdsp4 Tell Which Libraries are Revisioned?
The Cadence dfII library structure is described by a tree of cds.lib files. The tree is formed by DEFINE lines, which are the leaves of the tree, and INCLUDE lines, which are arcs to other cds.lib-format files. dfII applications perform a depth-first search of the tree and accumulate all DEFINE lines found to form the complete set of library definitions for the application’s session. The dfII Library Browser shows only the set of leaf library DEFINEs found in the search.
cdsp4 determines which of the libraries it found are under its control by reading the DMTYPE field of the cdsinfo.tag file in each library it found. If the DMTYPE field is set to the string p4, then it is under cdsp4 control. This further implies that each library with DMTYPE p4 must have a branch, and a set of clients formed by the strings:
library_name:branch_name:user
This works fine in a simple design where the project being worked on only has cdsp4-managed data for itself, and all other data is unmanaged data. Each invocation of addp4user builds the required clients.
14 Adding Libraries to Existing Branches and Workspaces (Admins Only)
14.1 Why Adding Libraries is Hard
At this time, adding libraries to existing branches under cdsp4 control can only be done the following way. This restriction will hopefully be lifted in the future.
Existing branches all trace their origins back to the cdsp4 Root (see Section 14.1). New branches built using buildbranch, or existing branches updated using buildbranch –add, all use the cdsp4 Root for their source data. Branches built from other branches using byob also eventually trace back to a branch built using buildbranch.
Adding a library to a cdsp4 project database requires adding a client for each new library to the existing set of clients for every branch and user workspace, as well as updating the cds.lib and cds.p4client files in all branches and user workspaces. All these parts of the cdsp4 database must be kept consistent with each other. The only way to ensure this is to update the data source (Root) with the new libraries, propagate the new data forward to all branches and user workspaces, and build new clients for each branch and user workspace for the new libraries.
In other words, the full sequence of steps of building each branch and user workspace as shown in Figure 2 must be repeated when adding libraries to an existing cdsp4 project database, but in this case only with incremental changes. Thebuildbranch script provides this capability with the –add option to update branches originally built with buildbranch or byob. Once the branches are updated, user workspaces need to be incrementally updated using the addp4user command.
14.2 Steps for Adding a New Library
Here is the full sequence of steps to add a new library to a new or existing cdsp4 project database. First, the information describing the example project is as follows (again, this is an example and does not correspond in all details to any real existing project):
· The existing project is called “dynamo”
o cdsp4 Root is /proj/hw/dynamo/root
o PROJECT is set to /proj/hw/dynamo/root
· The new library to be added is called dynamo_pcells
· The branch clients are located under /proj/hw/dynamo/root/branches
1. Confirm PROJECT is set to the cdsp4 project Root
Be sure your umask is set appropriately for the policy being used (umask 002 is advised).
2. As a user able to write into the cdsp4 Root directory tree, start up the Cadence environment in /proj/hw/dynamo/root/<your location where your cds.lib lives>. This postfix must match the CDS_P4MasterClientRelLocation in CDS_P4Config.il
3. Select Library Commands -> New from the Library Browser and create the new library dynamo_pcells. The library should attach to an existing Tech File, the technology library to be attached to in this example beingdynamo_techlib. When done with the forms, click the Rfsh button at the top of the Library Browser and confirm that the new library shows up in the library list.
4. Select the new dynamo_pcells library in the top window of the Library Browser, and select Library Commands -> Revision to inform cdsp4 that there is a new library to put under revision control. In the “Specify Revision Details” window that pops up, type in top for the Block Name field, select Design for the Lib Type menu, and click the OK button. Type CDS_P4Refresh in the CIW command line to update the cds.p4client file with the new library.
5. To confirm everything worked, select the pcells_dynamo library (single click), move the cursor out of the window, and confirm that the Library Browser’s top message window shows the client name pcells_dynamo:dynamo_a1 (or roughly similar). If it shows Not Revisioned, or the log window shows any errors, then this step failed.
6. Confirm that the cds.p4client file in the Project Root directory contains a line for the pcells_dynamo library.
7. The Root update is now finished. Exit Cadence.
8. You now have two options:
a) build a branch, using buildbranch
b) update an existing branch using the –add option of buildbranch
e.g.
buildbranch –add dynamo_pcells –bname dynamo_a0_cds1 –tp /proj/hw/dynamo/root/branches
9. Confirm that the cds.lib and cds.p4client files under each branch directory were updated with the new entry for dynamo_pcells, and that the dynamo_pcells directory was created under each branch directory.
10. Update all user workspaces using:
addp4user –bname branch_name –tp user_workspace_location –user user_name
15 Deleting Libraries from a cdsp4 ProjectBranch
It’s too hard to do properly. Ignore the libraries that are supposed to be gone. Hopefully, the next release of cdsp4 will take care of this. Bug Shiv a lot if this annoys you.